Showing posts with label ASP.NET Articles. Show all posts

Where to define AutoEventWireup attribute in ASP.NET

One can specify AutoEventWireup attribute in the following locations:
•
The Machine.config file
•
The Web.config file
•
Individual Web Forms (.aspx files)
•
Web User Controls (.ascx files)

What is AutoEventWireup attribute in ASP.NET

AutoEventWireup attribute is set to false  by default in the .aspx page and event handlers are automatically created.

When you set the value of the AutoEventWireup attribute to true, the ASP.NET runtime does not require events to specify event handlers like Page_Load or Page_Init.

Introduction to ASP.NET MVC using C#

Getting Started
Start by running Visual Studio 2010  and select New Project from the Start page.


Visual Studio 2010 - Start Page


Creating Your First Application
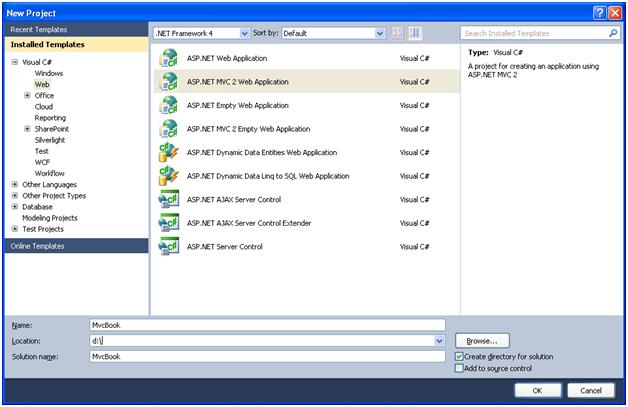
You can create ASP.NET MVC Web applications using either Visual Basic or Visual C# as the programming language. Select Visual C# on the left and then select ASP.NET MVC 2 Web Application. Name your project "MvcBook" and then click OK.
ASP.NET MVC 2 Web Application


This creates a simple "Hello World!" MVC project

MVC Home Controller Page


Click Debug menu, select Start Debugging or Press F5
Visual Studio launches a browser and opens the application's home page.
MVC 2 Application Home Page
 

ASP.NET MVC Design

ASP.NET MVC Design


ASP.NET MVC Design

ASP.NET MVC Design


ASP.NET MVC Design pattern derives from MVC design pattern i.e. Model View Controller design pattern. It seperates the responsibilities.C in MVC is for Controller. Controller is component which acts as target to external stimulus. Controller then responds to stimulus by calling Model to fetch data and then View to display data in UI .

ASP.NET MVC Design pattern seperates the behaviour i.e. Data , UI and Event.

Microsoft Web Platform Installer

Microsoft Web Platform Installer

Microsoft Web Platform Installer (Web PI) is a free tool that makes getting the latest components of the Microsoft Web Platform, including Internet Information Services (IIS), SQL Server Express, .NET Framework and Visual Web Developer easy. The Web PI also makes it easy to install and run the most popular free web applications for blogging, content management and more with the built-in Windows Web Application Gallery.


Download the Microsoft Web Platform Installer

http://www.microsoft.com/web/downloads/platform.aspx


Setting Menu options Dynamically based on Role in ASP.NET using LINQ

Setting Menu options Dynamically based on Role in ASP.NET using LINQ


Step 1. Add Menu control to aspx or master page.

<asp:Menu ID="menuRoleBased" runat="server" Font-Names="Verdana" ForeColor="WhiteSmoke" Orientation="Horizontal"
                            BorderColor="#FFCC99" BorderWidth="0px" Width="20%" Font-Bold="False" Font-Size="Smaller">
                            <StaticMenuStyle BorderWidth="1" BackColor="#FFCC99" BorderColor="White" BorderStyle="Solid" />
                            <StaticSelectedStyle Font-Names="Verdana" BackColor="#415779" ForeColor="white" Height="25px" />
                            <StaticMenuItemStyle CssClass="menuHoverStyle" Font-Names="Verdana" HorizontalPadding="4px"
                                BorderColor="White" BorderStyle="Solid" BorderWidth="1px" ForeColor="Black" Height="25px" />
                            <StaticHoverStyle CssClass="menuOrangeStyle" Height="25px" Font-Names="Verdana" ForeColor="Black" />
                            <DynamicHoverStyle CssClass="menuOrangeStyle" Height="25px" Font-Names="Verdana"
                                ForeColor="Black" />
                            <DynamicMenuStyle BorderStyle="Solid" BorderColor="white" BorderWidth="1" Height="25px"
                                Font-Names="Verdana" ForeColor="White" BackColor="#FFCC99" />
                            <DynamicSelectedStyle Height="25px" Font-Names="Verdana" ForeColor="White" BackColor="#001B36" />
                            <DynamicMenuItemStyle BorderStyle="Solid" BorderWidth="1px" BorderColor="white" Height="25px"
                                Font-Names="Verdana" ForeColor="white" BackColor="#FFCC99" HorizontalPadding="3px" />
                            <DataBindings>
                                <asp:MenuItemBinding DataMember="Menu" TextField="title" ValueField="description"
                                    NavigateUrlField="url" />
                                <asp:MenuItemBinding DataMember="SubMenu" NavigateUrlField="url" TextField="title"
                                    ValueField="description" />
                            </DataBindings>
 </asp:Menu>

Step 2 : Add a xml containing Menu  and Submenu Name , Url and Role. Add a xml file to your project and add below xml content to it.

Xml below has two menus - Request Leave menu for Employee and Approve Leave menu for Manager

<?xml version="1.0" encoding="utf-8" ?>
<RootMenu>
  <Menu url="" title="Request" description="Request" Role="Employee" MenuOrder="0">
    <SubMenu url="RequestLeave.aspx"  title="Request Leave" description="" />
  </Menu>
  <Menu  url=""  title="Approve" description="" Role="Manager" MenuOrder="1">
    <SubMenu url="ApproveLeave.aspx"  title="Approve Leave" description="" />
  </Menu>
 </RootMenu>

Step 3: Write a method to return roles of logged in user. In this example, I will create a GetRole method and populate to set Role array to Employee.

 public String[] GetRole()
    {
        return  new String[]{"Employee"};
    }

Step 4 : Write a method to get Menu xml string dynamically based on role.

public String GetMenu()
    {
        string strMenu = string.Empty;
        string[] loggedUserRole= GetRole();
        DataSet dsMenu = new DataSet();
        string strPath = @"D:\Menu\MenuRole.xml";
       
        XDocument xmlDoc = XDocument.Load(strPath);

        List<XElement> roleMenu = new List<XElement>();
        var test = from c in xmlDoc.Descendants("Menu")
                   join r in loggedUserRole on c.Attribute("Role").Value equals r
                   orderby c.Attribute("MenuOrder").Value ascending
                   select c;

        foreach (var p in test)
            strMenu = strMenu + p.ToString();
        strMenu = "<RootMenu>" + strMenu + @"</RootMenu>";
        return strMenu;
    }

Step 5 : Add xmlDataSource control to aspx or masterpage

<asp:XmlDataSource ID="srcXMLMPA" runat="server" XPath="RootMenu/Menu" EnableCaching="false">
    </asp:XmlDataSource>

Step 6 : Add the code to bind dynamically created Role based menu xml string to Menu control

srcXMLMPA.Data = GetMenu();
menuRoleBased.DataSource = srcXMLMPA;
menuRoleBased.DataBind();

Now run the web application to see the result . Since Role array was populated with Employee role therefore only Request Menu will be show . See the result below :
EmployeeMenu
Employee Menu


Now change GetRole method to return Employee and Manager role and run the application to see the difference :

ManagerMenu
Manager Menu

ASP.NET , C# - Configuring to use XML to display error and validation message

ASP.NET , C# - Configuring to use XML to display error and validation message


Step 1 - Add XML file to store error and validation message.
              Below is sample of ErrorMessage.xml :
<?xml version="1.0" encoding="utf-8" ?>
<appSettings>
<add key="NoMatchingRecord" value="No Matching Records Found"/>
<appSettings>                  

Below is sample of ValidationMessage.xml :

<?xml version="1.0" encoding="utf-8" ?>
<appSettings>

 <add key="EndDateGreaterthanStartDate" value="End Date should be greater than Start Date"/>
</appSettings>

If more error or validation message need to be added then add it to ErrorMessage.xml or ValidationMessage.xml with key and value pair. Also , make sure key is unique and not repeated in XML file. You can also add more XML files if needed

Step 2 - Add below key in appSettings section of Web.config file
<appSettings>
  <add key="ErrorMessage" value="D:\Config\ErrorMessage.xml"></add>
  <add key="ValidationMessage" value="D:\Config\ValidationMessage.xml"></add>
 </appSettings>

Above keys are added which contains path of XML file as  key value

Step 3 - Add a Class file and name it to CustomMessage.cs . Add below code in Custom Message.cs

using System;

using System.Data;
using System.Configuration;
using System.Web;
using System.Web.Security;
using System.Web.UI;
using System.Web.UI.WebControls;
using System.Web.UI.WebControls.WebParts;
using System.Web.UI.HtmlControls;
using System.Xml;
////// <summary> Summary description for CustomMessage/// </summary>
public class CustomMessage{
System.Xml.XmlDocument doc;

{
}
public CustomMessage(String FileName)
{
doc = new XmlDocument();
doc.Load(FileName);
}


/// <summary>/// To get value from XML file at specified location./// </summary>/// <param name="TagName"></param>/// <returns></returns>

public string GetMessageValue(string TagName)
    {
        string ConstString = string.Empty;
        try
        {
            //Get Connection path from XML file

            XmlNodeList elemList = doc.GetElementsByTagName("add");
            for (int i = 0; i < elemList.Count; i++)
            {
                string KeyName = elemList[i].Attributes["key"].Value;
                if (KeyName == TagName)
                {
                    ConstString = elemList[i].Attributes["value"].Value;
                }
            }
        }
        catch (Exception ex)
        {
        }
        return ConstString;
    }

}


CustomMessage class contains a public constructor which accepts FileName as input paramter and load the XML file into XMLDocument.

CustomMessage class also contains a method GetMessageValue which takes key as input parameter and returns value of key.

Step 4 - Final step is to consume the CustomMessage class to display appropriate message. Below is code in calling aspx or cs file :

string errorFile = ConfigurationManager.AppSettings.Get("ErrorMessage").ToString();
CustomMessage objCustomMessage = new CustomMessage(errorFile);

this.lblError.Text = objCustomMessage.GetMessageValue("NoMatchingRecord");


Line 1 is used to get path of ErrorMessage.xml
Line 2 is used to call Custom message class constructor to load XML file into XMLDocument
Line 3 is used to get value of error message key by passing key to CustomMessage method GetMessageValue

string validationFile = ConfigurationManager.AppSettings.Get("ValidationMessage").ToString();

CustomMessage objCustomMessage = new CustomMessage(validationFile);this.lblValidation.Text = objCustomMessage.GetMessageValue("EndDateGreaterthanStartDate");  


 Line 1 is used to get path of ValidationMessage.xml
 Line 2 is used to call Custom message class constructor to load XML file into XMLDocument
 Line 3 is used to get value of validation message key by passing key to CustomMessage method GetMessageValue

AJAX Client Side Event Life Cycle


AJAX Client Side Event Life Cycle


1.      Page Request

2.      Init

3.      Load

·         initializeRequest

·         beignRequest

·         pageLoading

·         pageLoaded

4.         Load

·          endRequest

5.      unLoad


 Interview Question links :


AJAX UpdateProgress control : Avoid multiple updates to Update Panel

This tutorial will demonstrate how UpdateProgress control can be used to avoid multiple updates to Update Panle while one update request is in progress.


To delay the refresh of data , Thread.Sleep of around 18000 milli seconds is introduced.

Steps to be followed are below :

1. Add a Script Manger control


<asp:ScriptManager ID="ScriptManager1" runat="server"></asp:ScriptManager>

 2. Add a AJAX Update Panel control . With in UpdatePanel control , add a Label and Button control


<asp:UpdatePanel ID="updPanel" runat="server" UpdateMode="Conditional"><ContentTemplate><asp:Label runat="server" id="lblDateTime" ></asp:Label>

</<asp:Button runat="server" id="btnUpdateDateTime" text="Update Date Time" onclick="btnUpdateDateTime_Click" />ContentTemplate></asp:UpdatePanel>

 3. Add a AJAX UpdateProgess control and Set to AssociatedUpdatePanelID to UpdatePanel control id.


<asp:UpdateProgress ID="updProgess" runat="server" AssociatedUpdatePanelID="updPanel" ><ProgressTemplate>Please Wait.Refreshing Data ...<br /><span id="msgSpan"></span></ProgressTemplate></asp:UpdateProgress> 


4. Add a script block below Script Manager Control  :

<script type="text/javascript">

Sys.WebForms.PageRequestManager.getInstance().add_initializeRequest(CheckStatus);
function CheckStatus(sender,args)

{
var par = Sys.WebForms.PageRequestManager.getInstance();
              if ( par.get_isInAsyncPostBack())
               {
                      $get("msgSpan").innerHTML = " Still processing previous request..";
                       args.set_cancel(true);
               }
              else
             {
                     $get("msgSpan").innerHTML = ""

             }
}
</script>

5. Add Update Button click event


protected void btnUpdateDateTime_Click(object sender, EventArgs e)

{
Thread.Sleep(10000);
lblDateTime.Text = DateTime.Now.ToString();

}

In the client script CheckStatus , we get instance of web form from PageRequestManager. Then we check where there is any Async Post Back is in progress using the method get_isInAsyncPostback(). If yes, then message is set to Still processing previous request. If no then message is set to blank.

Demo of what we have acheieved using above code

Page on initial load :


Page on click of Update Date Time button


Page on click of Update Date Time button avoid multiple updates


Hope you enjoyed this tutorial. For feedback , please leave your comments. Happy Coding


What is ScriptManager ?


 ScriptManager


ScriptManager control on a page  is used to enable the Microsoft Ajax features of ASP.NET:
  • Client-script functionality of the Microsoft Ajax Library,

  • Partial-page rendering, which enables portions of page to be independently refreshed without a postback.  UpdatePanel, UpdateProgress, and Timer controls require a ScriptManager control in order to support partial-page rendering.

  • JavaScript proxy classes for Web services, which enable you to use client script to access Web services and specially marked methods in ASP.NET pages. It does this by exposing the Web services and page methods as strongly typed objects.

  • JavaScript classes to access ASP.NET authentication, profile, and roles application services.

How to store Database Connection string in web.config and get Connection sting in .cs file ?

How to store Database Connection string in web.config and get Connection sting in .cs file ?


You need to add connection string under  AppSettings or Connection strings tag

Example 1 : In appSettings section in web.config

Web.Config

<appSettings>

        <add key="SQLConnection1" value="Database=MDS,Server=TestServer,UserID=sa,Password=sa" />

  </appSettings>


In .cs file , Configuration Manager class is used to fetch connection string . See below code to see how :

string strSQLConnection1 = ConfigurationManager.AppSettings["SQLConnection1"];

But the better way is to add connection string in connectionstrings tag in web.config

See Web.Config for details :

<connectionStrings>

  <add name="SQLConnection2" connectionString="Database=MDS,Server=TestServer,UserID=sa,Password=sa" providerName="System.Data.SqlClient"/>

 </connectionStrings>


You can retrieve the connection string in web.config using Configuration Manager class in .cs file :

string strSQLConnection2 = ConfigurationManager.ConnectionStrings["SQLConnection2"].ConnectionString;


Passing Client Certificate for authentication to Web Service in ASP.NET Method

Passing Client Certificate for authentication to Web Service in ASP.NET Method


To pass Client Certificate for authentication to Web Service in ASP.NET Method , we need to use Web Service Enhancements 2.0 or 3.0 .


Below code shows passing client certificate using WSE 2.0 :

WSE 2.0 method
// Get certificates under Personal in Local Machine Store
X509CertificateStore store =
X509CertificateStore.LocalMachineStore(X509CertificateStore.MyStore);
store.OpenRead();
// Get Certificate Collection with below Subject
X509CertificateCollection col =
(
X509CertificateCollection)store.FindCertificateBySubjectString("certName");
X509Certificate cert = null;
cert = col[0];
// Add Certificate to Web Service to pass it
jobService.ClientCertificates.Add(cert);

Below code shows passing client certificate using WSE 3.0 :
WSE 3.0 method

X509Storestore = new X509Store(StoreName.Root, StoreLocation.LocalMachine);
store.Open(
OpenFlags.ReadOnly);
X509Certificate2Collection certs = store.Certificates.Find(X509FindType.FindByIssuerName, certHash, false);
if (certs.Count == 1)
{X509Certificate2 cert =
((
X509Certificate2)certs[0]);
}
// Add Certificate to Web Service to pass it
jobService.ClientCertificates.Add(cert);

WSE 3.0 is used to find client certificates in Local Machine and Personal store where as WSE 2.0 is used to find client certificates in Local Machine store but it cannot find certificates in Personal store.


ASP.NET Security - SQL Injection

ASP.NET Security - SQL Injection


Every developer should validate web form input . Web Form input allows hacker to enter to enter malformed SQL statement so that it can fetch the unauthorized data from database , delete the tables , update the column values.

Below is SQL command which is vulnerable and prone to SQL Injection :

string strSQL = "SELECT ProductId, ProductName, " +" FROM Products" +" WHERE ProductName LIKE '" + txtSearch.Text + "'";

Hacker can enter below criteria in input text box to fetch all the products :
' Or 1=1 --

Hacker can update column value by entering below criteria in text box :
'; UPDATE Products SET UnitPrice = 0.01 WHERE ProductId = 1--

Hacker can delete table values by entering below criteria in text box :
'; DELETE FROM Products --
Hacker can also delete tables if developer is connecting using admin level account user
'; Drop Table User --
So developers should do the below to avoid SQL Injection :
  1. Developer should validate all textbox entries using validation controls, regular expressions, code.

  2. Developer should use parameterized SQL or stored procedures

  3. Developer should encrypt  passwords and other sensitive data.

  4. Developer should encrypt connection strings

  5. Developer should not use admin access account for connection to database . Developer should use limited access account to connect to the database.

  6. Developer should use custom error messages. Developer should not use display SQL error messages.

Determine how an ASP.NET Web page was invoked

Determine how an ASP.NET Web page was invoked


Examine the values of the following Page class properties, and then refer the table to determine how the page was invoked:

  • IsPostBack

  • PreviousPage

  • IsCrossPagePostBack

  • IsCallback

The following table lists ways in which a page can be invoked and the corresponding Page property values.

Invocation method

Property values

Original request

  • IsPostBack is set to false.

  • PreviousPage is set to null (Nothing in Visual Basic).

  • IsCallback is set to false.

Postback

  • IsPostBack is set to true.

  • PreviousPage is set to null (Nothing in Visual Basic).

  • IsCallback is set to false.

Cross-page posting

  • IsPostBack is set to false.

  • PreviousPage references the source page.

  • IsCrossPagePostBack is set to true.

  • IsCallback is set to false.

Server transfer

  • IsPostBack is set to false.

  • PreviousPage references the source page.

  • IsCrossPagePostBack that is referenced in the PreviousPage is set to false.

  • IsCallback is set to false.

Callback

  • IsPostBack is set to false.

  • PreviousPage is set to null (Nothing in Visual Basic).

  • IsCallback is set to true.

Labels

.NET Framework Interview Questions (7) .NET Interview Questions (10) .NET Remoting Interview Questions (1) ADO.NET and BLOB Error (1) ADO.NET Interview Questions (4) Agile Articles (9) AJAX Articles (5) AJAX Interview Questions (11) Algorithms (2) Analytics Articles (2) Analytics Interview Questions (3) Android FAQs - Part 1 (2) Articles (13) ASP.NET Articles (24) ASP.NET Error and Resolution (4) ASP.NET Interview Questions (23) ASP.NET Tutorial (8) AWS Interview Questions (16) Business Analyst Interview Questions (1) Cloud Computing Interview Questions (16) CSharp Articles (17) CSharp Interview Questions (32) CSharp Tutorial (17) Data Analysis (2) Data Structure (1) Design Pattern Articles (5) DevOps Tutorial (1) Digital Marketing Interview Questions (1) Download Templates (1) Error Resolution (6) Excel Articles (9) Excel Macros (1) Excel Tips and Tricks (10) HTML5 Interview Questions (3) HTML5 Tutorial (3) Interview Preparation (2) Interview Questions (24) Introduction to Business Analytics (10) Introduction to Python (7) Introduction to R Programming (23) JAVA Articles (6) Java Tutorial (5) LINQ Articles (4) LINQ Interview Questions (2) LINQ Tutorial (3) Microservices Interview Questions (1) MVCInterviewQuestions (2) OOPs Interview Questions (4) Oracle 9i Tutorial (14) Oracle Articles (2) Oracle Interview Questions (15) Outlook Error (1) PHP Interview Questions (3) PHP Tutorial (3) Product Management (12) Product Management Interview Questions (14) Product Owner Interview Questions (2) Program Management (5) Project Management (13) Project Management Articles (34) Project Management Interview Questions (25) Quiz (1) RallyDev Help (1) Scrum Master Interview Questions (11) Selenium Tutorial (1) Sharepoint Articles (1) SQL Interview Questions (23) SQL Server Articles (20) SSIS Interview Questions (6) SSRS Interview Questions (1) Technical Program Management (12) Technical Program Management - Interview Questions (24) TechnicalProgramManagement (5) Threading Interview Questions (2) Tutorial (8) UML Articles (3) UML Interview Questions (2) Unix (3) UNIX Tutorial (3) WCF Articles (20) WCF Interview Questions (9) WCF Quiz (2) WCF Tutorial (16) Web Service Articles (5) Web Service Interview Questions (3) Window Azure (1) XML Articles (6) XML Interview Questions (3) XML Tutorial (3)